Getting started with TensorFlow.js
Machine Learning is a complex discipline but implementing machine program’s or models is far less daunting and difficult that’s due to various machine learning framework such as Google’s Tensorflow, pyTorch, Microsoft’s CNTX ,NEXT . Created By Google Brain team tensorflow is an open source library for Numerical Computation and large scale Machine learning. In Tensorflow all the computations involves tensors where tensors are the standard way of representing the data in machine learning or deep learning models.Tensor is a vector or matrix of n-Dimensions that represents the data type. All the operations are conducted inside a graph and a graph is a set of computation that take place successively .Each operation is called an open note and are connected to each other . TensorFlow allows the user to create data flow graph which describe how data moves through a graph and a series of processing nodes each node in the graph is represents mathematical operation and each connection is Multidimensional array or tensor.
What are Tensors?
Tensors are nothing but a de facto for representing the data in deep learning.
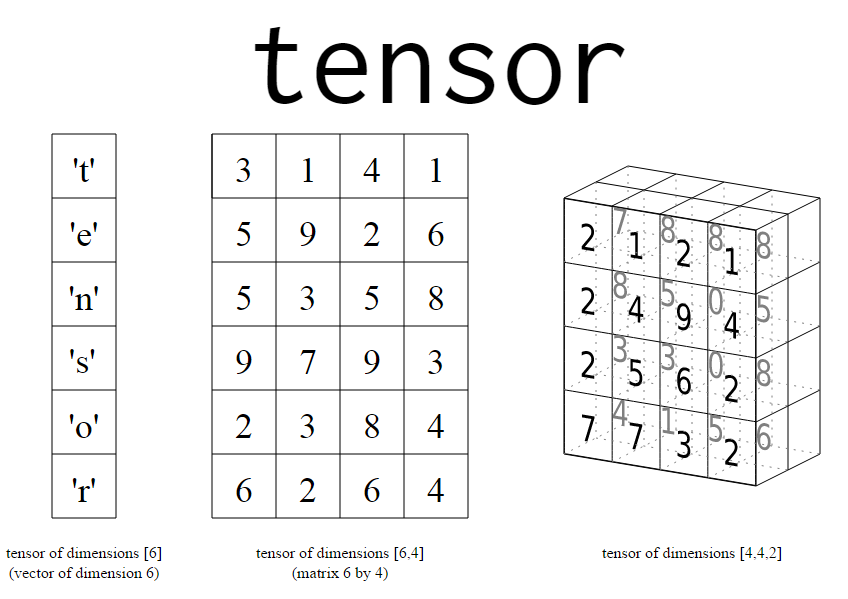
Deep Learning in the image above, tensors are just multidimensional arrays, that allows you to represent data having higher dimensions. In general, Deep Learning you deal with high dimensional data sets where dimensions refer to different features present in the data set. In fact, the name “TensorFlow” has been derived from the operationswhich neural networks perform on tensors. It’s literally a flow of tensors. Since, you have understood what are tensors, let us move ahead in this TensorFlow tutorial and understand – what is TensorFlow?
What is TensorFlow?
TensorFlow is a library based on Python that provides different types of functionality for implementing Deep Learning Models. As discussed earlier, the term TensorFlow is made up of two terms – Tensor & Flow:
In TensorFlow, the term tensor refers to the representation of data as multi-dimensional array whereas the term flow refers to the series of operations that one performs on tensors as shown in the above image.
Now we have covered enough background about TensorFlow.
Next up, in this TensorFlow tutorial we will be discussing about TensorFlow code-basics.
TensorFlow Technical Architecture:
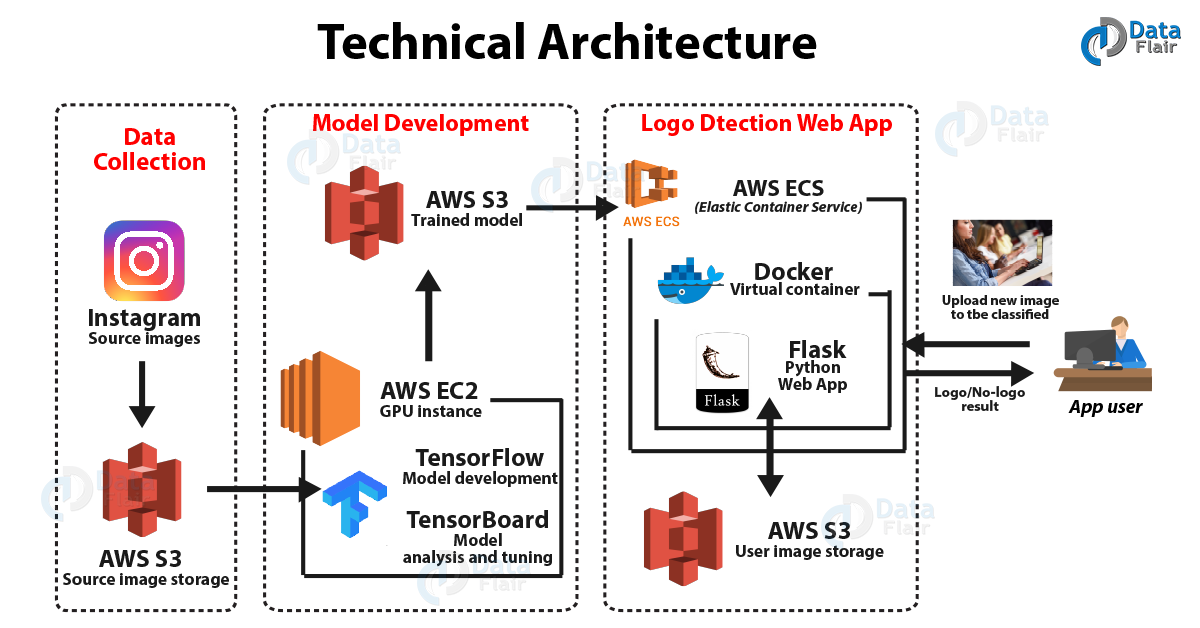
- Sources create Loaders for Servable Versions, then Loaders are sent as Aspired Versions to the Manager, which loads and serves them to client requests.
- The Loader contains whatever metadata it needs to load the Servable.
- The Source uses a callback to notify the manager of the Aspired Version.
- The manager applies the configured Version Policy to determine the next action to take.
- If the manager determines that it’s safe, it gives the Loader the required resources and tells the Loader to load the new version.
- Clients ask the manager for the Servable, either specifying a version explicitly or just requesting the latest version. The manager returns a handle for the Servable. The Dynamic Manager applies the Version Policy and decides to load the new version.
- The Dynamic Manager tells the Loader that there is enough memory. The Loader instantiates the TensorFlow graph with the new weights.
- A client requests a handle to the latest version of the model, and the Dynamic Manager returns a handle to the new version of the Servable.
TENSORFLOW.JS
On Friday, 30 March 2018, the TensorFlow team announced the arrival of the much-awaited web version of the famous ML framework, TensorFlow.js. On which developers can build lightweight models and directly run them on the browser without any hassle. Tensorflow.js an open-source library you can use to define, train, and run machine learning models entirely in the browser, using Javascript and a high-level layers API. TensorFlow.js incudes Keras A PI and exposes it as it’s high-level API . This is very nice and it eases up the process of building machine learning and deep learning models. It also includes a lower level API , previously called deeplearn.js , which can be used for linear algebra and automatic differentiation . Eager execution is supported as well. Underneath it all TensorFlow.js is powered by WebGL , a JavaScript API for rendering 2D and 3D graphics within any web browser without the plug-ins.
What can you do with TensorFlow.js?
If you’re developing with TensorFlow.js, here are three workflows you can consider
- You can import an existing, pre-trained model for inference. If you have an existing TensorFlow or Keras model you’ve previously trained offline, you can convert into TensorFlow.js format, and load it into the browser for inference.
- You can re-train an imported model. You can use transfer learning to augment an existing model trained offline using a small amount of data collected in the browser using a technique called Image Retraining. This is one way to train an accurate model quickly, using only a small amount of data.
- Author models directly in browser. You can also use TensorFlow.js to define, train, and run models entirely in the browser using Javascript and a high-level layers API.
Installation:
Here’s how to install Tensoflow.js for the client side. There is also a server-side version that runs on Node.js, but we won’t be using that in the tutorial:
npm install @tensorflow/tfjs
<script src = "https://cdn.jsdelivr.net/npm/@tensorflow/tfjs@0.13.3/dist/tf.min.js"> </script>
Building a Linear Regresion Model in TensorFlow.js
What is Linear Regresion?
Linear regression is a linear approach to modeling the relationship between a scalar response (or dependent variable) and one or more explanatory variables (or independent variables). The case of one explanatory variable is called simple linear regression .
Lets Move on to implementing our model in tensorflow.js:
- Initialize training data in tensors:
const ys = tf.tensor1d([2, 2, 4, 3, 4.5, 4.5, 7, 10]); const xs = tf.tensor1d([1, 2, 3, 4, 5, 6, 7, 8]); - Initialize the beginning variables for the model:
Unlike tensors, variables can be changed. We need to initialize the parameters of
the model with some values, to give gradient descent something to tweak:
let m = tf.scalar(Math.random()).variable(); let b = tf.scalar(Math.random()).variable(); - Define the Model : For Our Model, we use simply y = mx + b,
const model = x =>m.mul(x).add(b);
- Make the optimizer.:
This one is a stochastic gradient optimizer, which means
that our results will vary slightly each time we run this script. The upside of using
the stochastic approach is that it’s faster.
const learningRate = 0.01; const optimizer = tf.train.sgd(learningRate); - Define a loss function:
Mean Squared Error:
const loss = (pred, actual) => pred.sub(actual).square().mean(); - Train the model: With each loop, the model variables are adjusted to minimize the output of the loss function:
  for (let i = 0; i < 10; ++i) {
  optimizer.minimize(() => loss(model(xs), ys));
  }
- Use the model to predict outcomes. We can get predictions for a single value, or an array of values:
  const singlePrediction = model(2.3).dataSync();
//predicted result: 2.508747100830078
  const arrayPrediction = model([2.3, 11, 100]).dataSync();
// predicted result: [2.508747100830078, 10.984630584716797,97.69194030761719]
 And that’s it! Below is a similar graph of the data used to train the model and a line
representing our model’s predictions at each value for x. Use the p5.js library to
implement this visualization of our model in the browser.
And that’s it! Below is a similar graph of the data used to train the model and a line
representing our model’s predictions at each value for x. Use the p5.js library to
implement this visualization of our model in the browser.
Building an Image Classification Model in your Browser using a Webcam
- Open a text editor of your choice and create a file index.html. Save the following code in this file:
< meta http-equiv = "X-UA-Compatible" content = "IE=edge" >
< meta name = "viewport" content = "width=device-width,
initial-scale=1" >
<!-- title of the page -->
< title >image_classification</ title >
<!-- load processing library-->
< script
src = "https://cdnjs.cloudflare.com/ajax/libs/p5.js/0.8.0/p5.min.js" ></ s
cript >
< script
src = "https://cdnjs.cloudflare.com/ajax/libs/p5.js/0.8.0/addons/p5.dom.
min.js" ></ script >
<!-- load ml5.js -->< script
src = "https://unpkg.com/ml5@0.1.1/dist/ml5.min.js" ></ script >
<!-- load index.js -->
< script src = "index.js" ></ script >
</ head >
< body >
<!-- this is where the video will be shown -->
< video id = "video" ></ video >
</ body >
</ html >
- Next, create another file index.js and write the following code in it
let mobilenet;
let video;
let label = '' ;
// when model is ready make predictions
function modelReady () {
console . log ( 'Model is ready!!!' );
mobilenet. predict (gotResults);
}
function gotResults (error, results) {
if (error) {
console . error (error);
} else {label = results[ 0 ]. className ;
// loop the inference by calling itself
mobilenet. predict (gotResults);
}
}
// setup function
function setup () {
createCanvas ( 640 , 550 );
// ml5 to create video capture
video = createCapture ( VIDEO );
video. hide ();
background ( 0 );
// load the MobileNet and apply it on video feed
mobilenet = ml5. imageClassifier ( 'MobileNet' , video,
modelReady);
}
function draw () {
background ( 0 );
// show video
image (video, 0 , 0 );
fill ( 255 );
textSize ( 32 );
// show prediction label
text (label, 10 , height - 20 );}
Save both the files and open your index.html file in a browser like Google Chrome or Mozilla Firefox. That’s it! You have now created an app that can classify images in real-time using your webcam in the browser itself! Here is how it looks.

- In the above example, we used a pre-trained image classification model called MobileNet
- We used ml5.js , a library built on top of TensorFlow.js, to load the MobileNet model into our browser and perform inference on the video feed
- We also leveraged the P5.js library to process the video feed and display labels on the video itself